Environments
Setting up and managing multiple environments.
Skylight Environments
By default, the Skylight agent only enables itself in the production environment. In many cases, your applications will have other environments that you would like to profile using Skylight. For example, Rails ships with development and test environments by default. (You can also create additional Rails environments, such as staging.) This page shows you how to configure Skylight to profile these other environments so that you can view them separately in the Skylight UI:

Skylight Environments vs. Rails Environments
Your Skylight environment name can differ from your Rails environment. For example, many staging servers are actually running the production environment. Or, you might have multiple staging servers running different versions of your app, so you want to see the Skylight data for them separately: staging-1, staging-2, etc. Because Skylight relies heavily on request aggregation, we recommend that all servers running the same version of your app be given the same environment name.
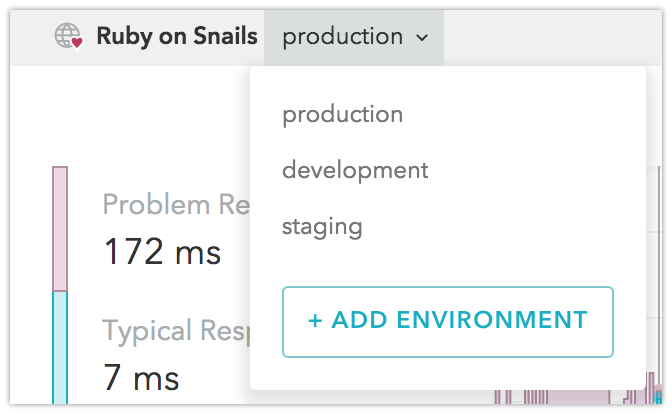
Prioritizing the “Production” Environment
We have designed the Skylight user experience to prioritize the production environment. In addition to being enabled by default, the production environment will always be listed first in the Skylight user interface. Furthermore, only the production environment will be displayed in your weekly Trends emails (though you can still view Trends for all environments using the Trends in the UI beta feature).
For this reason, we strongly recommend against naming your primary production environment something other than production.
Migrating Your Existing Environment Setup
IMPORTANT:
If you already have multiple environments set up using the legacy method of creating separate apps, the instructions on this page do not apply to you. Instead, visit the merge settings page for details on how to merge these legacy environment apps into their parent apps.
Enabling Additional Environments
The process for enabling additional environments is straightforward but varies depending on how you configure Skylight and whether or not you use Rails. Be sure you are following the correct set of instructions below.
For Rails, Using skylight.yml
1. Upgrade to the latest Skylight agent.
The Environments feature is available with version 3.0.0 and up of the Skylight agent. If, for any reason, you can’t upgrade to this version, contact us at support@skylight.io for an alternative method of setting up multiple environments.
2. Add the new environment to Skylight’s environments list.
# config/application.rb
config.skylight.environments << "staging"
The environment name you add to the array should match Rails.env on your server. Note that if Rails.env == "production" you can skip this step.
IMPORTANT:
If you choose to do config.skylight.environments += ["development", "staging"] make sure to use += and not = to add your environments, lest you accidentally turn off Skylight in your production environment.
3. [OPTIONAL] Specify an environment name.
If your environment name is always the same as your Rails environment, the Skylight agent will automatically detect your environment! Skip this step.
If your environment name differs from your Rails environment:
See an example of why this might be the case.
Use environment-specific configuration to override the environment name.
# config/skylight.yml
authentication: <app auth token>
staging:                                 # Rails environment
  env: <%= "staging-#{server_number}" %> # Skylight environment
IMPORTANT:
Be careful when using dynamic environment or component names. These names should be consistent and finite in number. If the name changes, data continuity will be broken.
4. Deploy and watch your data trickle in!
Deploy the above changes following your normal deploy process. Your new environment should show up in the environments selector in the Skylight UI nav bar.
For Rails, Using Environment Variables
Alternatively, if you use environment variables to configure Skylight, follow these instructions:
1. Deploy your app with the latest Skylight agent.
The Environments feature is available with version 3.0.0 and up of the Skylight agent. If, for any reason, you can’t upgrade to this version, contact us at support@skylight.io for an alternative method of setting up multiple environments.
2. Enable Skylight in the new environment.
Set the following environment variables in the new environment to enable Skylight.
SKYLIGHT_AUTHENTICATION=<app auth token>
SKYLIGHT_ENABLED=true
3. [OPTIONAL] Specify an environment name.
Note:
If your environment name is always the same as your Rails environment, the Skylight agent will automatically detect your environment! Skip this step.
If your environment name differs from your Rails environment:
See an example of why this might be the case.
Set the environment name explicitly. For example:
SKYLIGHT_ENV=staging-42
For Sinatra or Grape, using skylight.yml
1. Upgrade to the latest Skylight agent.
The Environments feature is available with version 3.0.0 and up of the Skylight agent. If, for any reason, you can’t upgrade to this version, contact us at support@skylight.io for an alternative method of setting up multiple environments.
2. Require and start the Skylight agent in each of your desired environments.
For example, in Sinatra:
configure :production, :staging do
  require "skylight/sinatra"
  Skylight.start!(file: PATH_TO_CONFIG, env: ENVIRONMENT)
end
PATH_TO_CONFIG should point to your config/skylight.yml file and ENVIRONMENT should return the current environment as a string (e.g. Rails.env.to_s).
3. Specify an environment name.
Use environment-specific configuration to override the environment name. The environment name can be dynamic if your environment name “differs from the environment specified in Skylight.start!. (See an example of why this might be the case.) For example:
# config/skylight.yml
authentication: <app auth token>
staging:
  env: "staging" # or <%= "staging-#{server_number}" %>
IMPORTANT:
Be careful when using dynamic environment or component names. These names should be consistent and finite in number. If the name changes, data continuity will be broken.
4. Deploy and watch your data trickle in!
Deploy the above changes following your normal deploy process. Your new environment should show up in the environments selector in the Skylight UI nav bar.
For Sinatra or Grape, Using Environment Variables
1. Upgrade to the latest Skylight agent.
The Environments feature is available with version 3.0.0 and up of the Skylight agent. If, for any reason, you can’t upgrade to this version, contact us at support@skylight.io for an alternative method of setting up multiple environments.
2. Require and start the Skylight agent in each of your desired environments.
For example, in Sinatra:
configure :production, :staging do
  require "skylight/sinatra"
  Skylight.start!(env: ENVIRONMENT)
end
ENVIRONMENT should return the current environment as a string (e.g. Rails.env.to_s).
3. Enable Skylight in the new environment.
Set the following environment variables in the new environment to enable Skylight.
SKYLIGHT_AUTHENTICATION=<app auth token>
SKYLIGHT_ENABLED=true
4. Specify an environment name in the new environment.
SKYLIGHT_ENV=staging
Your environment name can be more specific for finer-grained control over your Skylight data:
SKYLIGHT_ENV=staging-42
4. Deploy and watch your data trickle in!
Deploy the above changes following your normal deploy process. Your new environment should show up in the environments selector in the Skylight UI nav bar.
Environment-Specific Configuration
If you have Skylight enabled in multiple environments, you may want to configure each environment differently.
Environment-specific configuration can be set easily in config/skylight.yml. You can set default configuration that will apply to all environments or namespaced configuration to apply to a specific environment. Any variable scoped to an environment’s namespace will override a default.
# config/skylight.yml

# default configuration used in all environments goes here
authentication: <app auth token>
log_file: log/skylight.log

# namespaced configuration used only in the staging environment
staging:
  log_file: twig/skylight.log # overrides log/skylight.log
Alternatively, just set the appropriate ENV variables in each environment.
Skylight Environments for Open Source Apps
By default, the Skylight agent only enables itself in the production environment, but enabling Skylight in other environments is super easy!
We welcome our Skylight for Open Source customers and their contributors to profile these other environments so that you can view them separately in the Skylight UI:
If you would like to help an open source app enable Skylight in a new environment, see the Skylight Environments section to learn more, then open a PR to the open source project.
Learn more about the Skylight for Open Source program at the OSS page.