App and Account Management
Add collaborators, manage your apps, and explore billing details.
Account Management
Connecting your Account to GitHub
Connecting your account to GitHub is necessary for certain Skylight features, including:
Signing up with GitHub
Sign up for Skylight with GitHub to have a GitHub-connected account from the get go. If you sign up with GitHub, you will not be asked to provide a password. Signing up with GitHub is highly recommended for users who would like to use two-factor authentication (2FA) for logging in to Skylight.
Connecting an existing account to GitHub
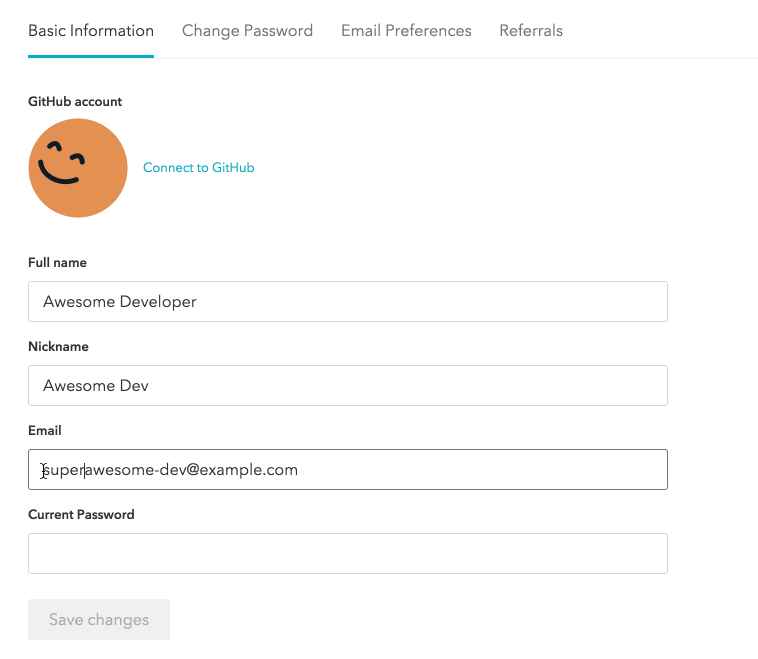
To connect an existing account to GitHub, head over to your account settings page and click the “Connect to GitHub” button.

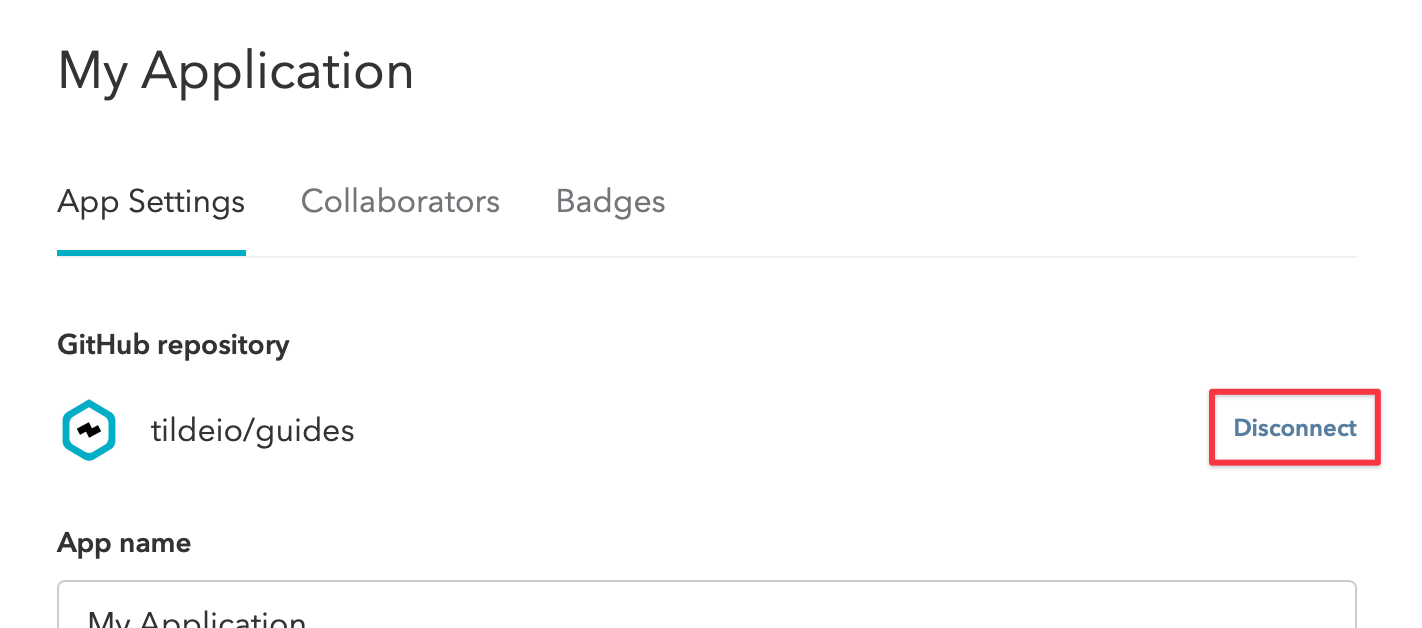
Disconnecting your account from GitHub
To disconnect your account from GitHub, head over to your account settings page and click the “Disconnect…” button under “GitHub account.”

Note that GitHub-only accounts cannot disconnect from GitHub.
Changing your email address
GitHub-connected account
If you signed up with GitHub, your Skylight email address will automatically default to your GitHub email address. If you want to change it, first be sure the alternate email address has been added to your GitHub account. Then, head over to your account settings page to choose the correct email address.

Email-connected account
If you have an email and password (even if your account is also connected to GitHub), you can change your email address on your account settings page.
Changing your password
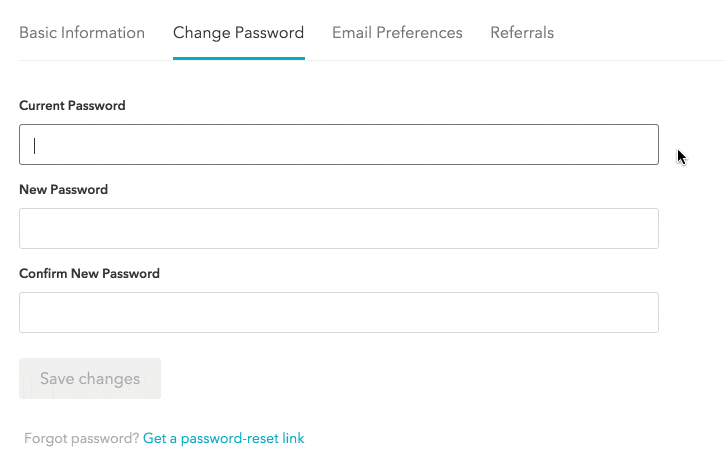
If you signed up for Skylight with an email and password, you can change your password on the password settings page.
Cancelling your account
We’re sorry to see you go! If you wish to cancel your account, we recommend that you first remove the Skylight gem from your apps to prevent any further charges. Then, visit your account settings page, scroll to the bottom, and click “Cancel your account…”. Follow the instructions in the modal to pay any remaining balance and cancel your account.
App Management
App ownership
Currently, only one single Skylight user can retain ownership of an app. The owner of an app is responsible for managing payments and credit card information, has access to an app’s billing history, and can also rename and delete an app.
Note:
You can transfer app ownership to another Skylight user by contacting us via the in-app messenger.
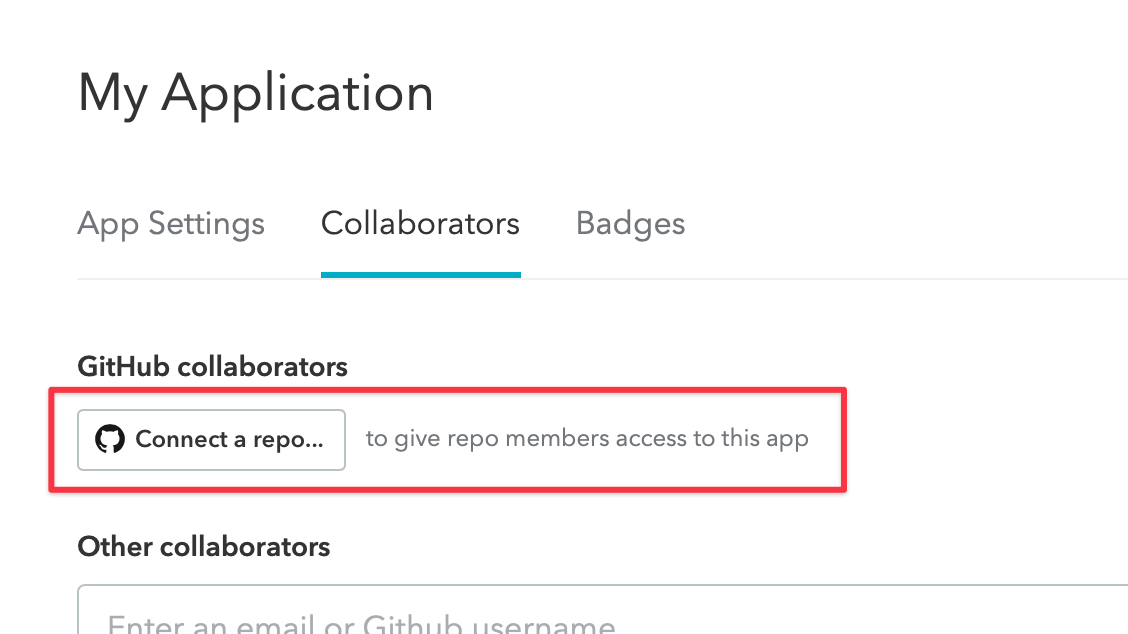
Connecting an app to GitHub
Connecting your app to GitHub is necessary for certain Skylight features, including:
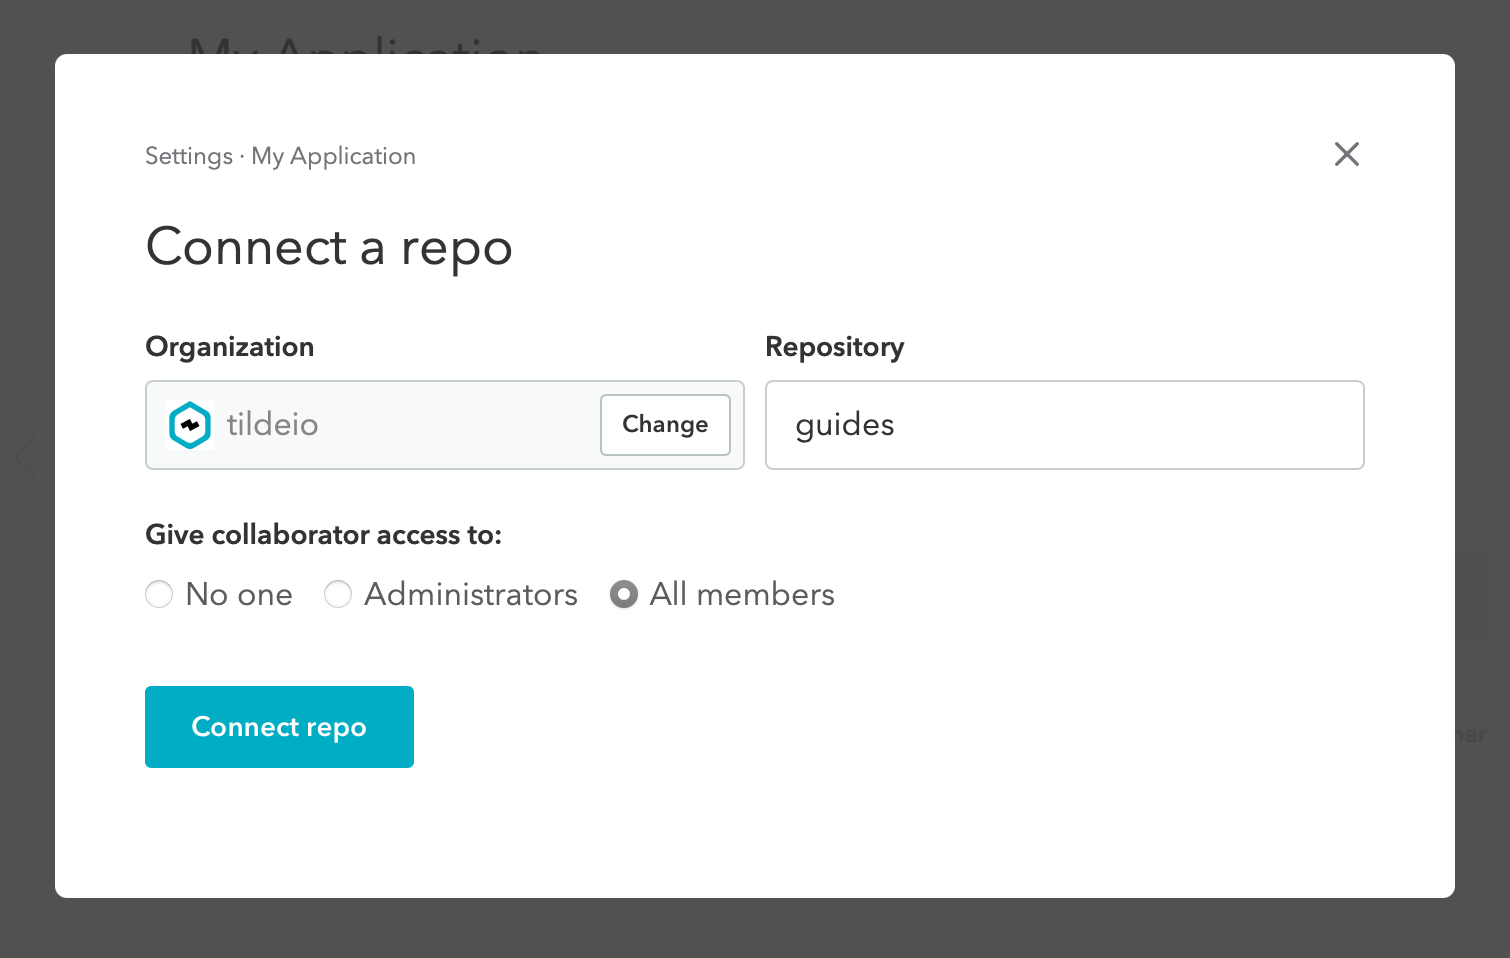
If you are the owner of the app on Skylight and your account is connected to GitHub, navigate to your app’s settings page.
- Choose the organization that owns the app you’re looking for (it must be an organization repo).
- Choose the repo you wish to connect to GitHub.
- Select your desired collaborator access settings. You can choose to give access to admin users only, to all GitHub users with access to the repo, or to no one.
- Click “Connect repo” and you’re done!
Removing or changing a repo already connected to a Skylight app
- Navigate to your app’s settings page.
- Click on “disconnect.” If you only want to remove the repo, you’re done!
- If you want to replace it with a different repo, just follow the steps above for adding a repo.
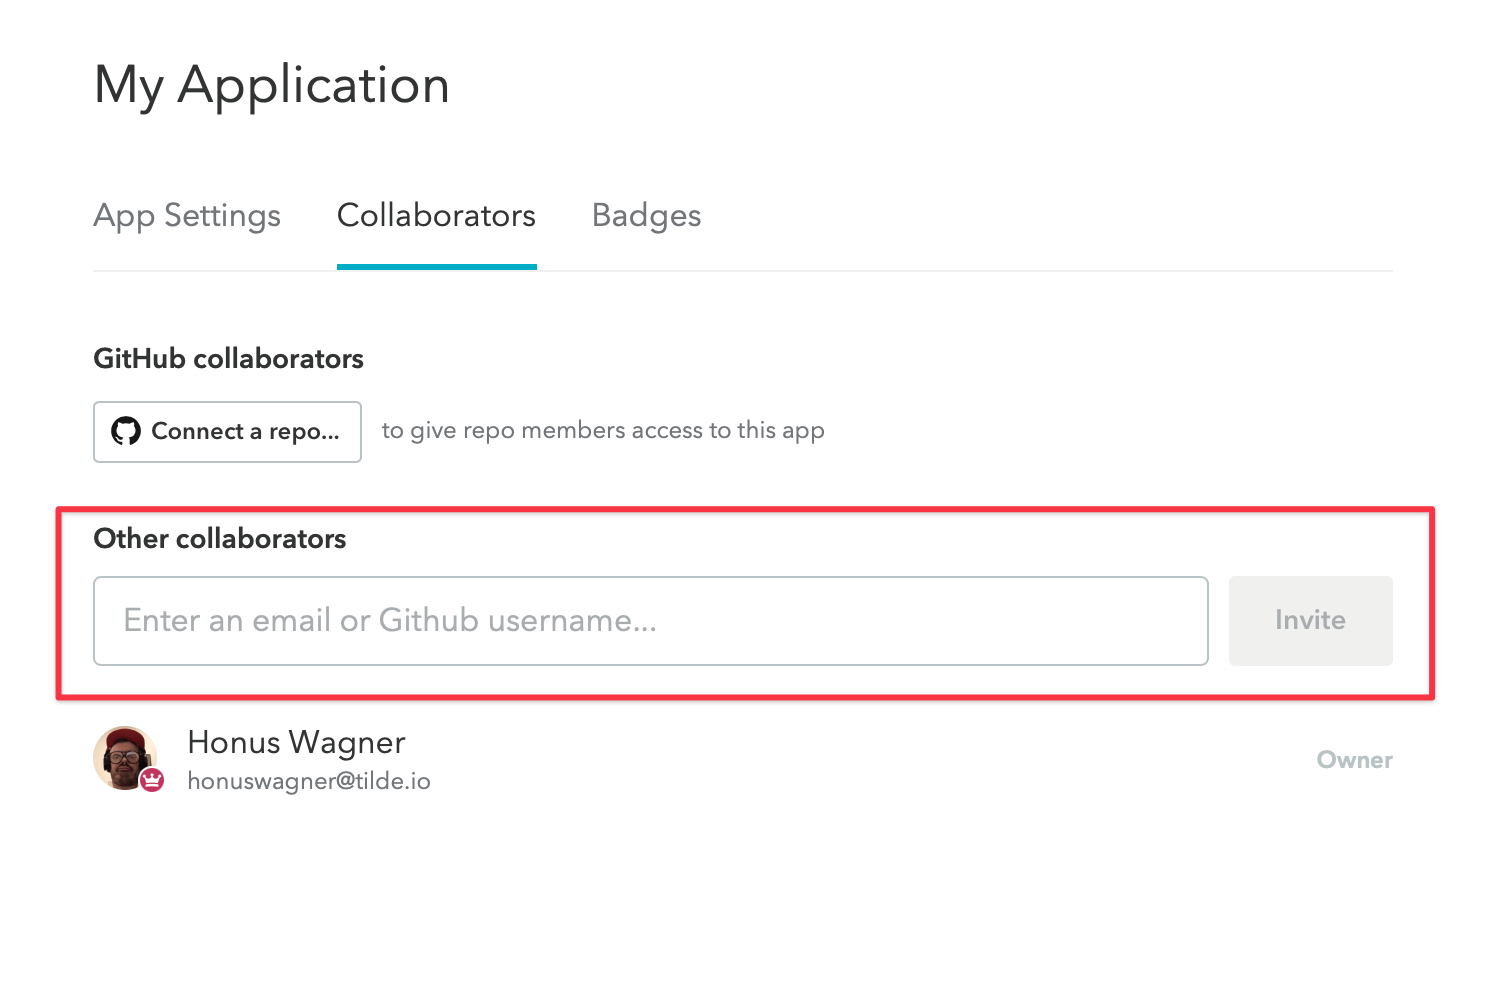
Sharing an app with others
If you’re the app owner, you can share an app with multiple people at once on your app’s settings page using GitHub. Anyone with access to the app can add new collaborators using email addresses, also on your app’s settings page. You can add unlimited users/collaborators to your app.
Note that invites are currently app-specific only. If you want to grant access to multiple apps, repeat the steps below on the settings page of each app.
Add multiple users through GitHub
Chances are, the people who need access to an app on Skylight will be the same people working on that app and pushing code to GitHub. With Skylight’s GitHub integration you can give access to all those people in just a few clicks!
- Connect your app to a GitHub repo and select the desired GitHub collaborator settings (admin users only or all GitHub users with access to the repo).
- Have your collaborators create a Skylight account with GitHub or connect their existing accounts to GitHub.
All qualifying GitHub-connected users will be automatically added as collaborators to your app! Easy!
Learn more about this feature:
- GitHub collaborators announcement blog post
- Our blog post detailing the development of this feature
- Feature FAQ
- Feature Troubleshooting Guide
With restricted third-party access on your Github organization
If you have restricted OAuth app access to your Github organization’s data, you will need to enable Skylight on the organization itself. To do so, ensure you have connected your Skylight account to your personal Github account first, then:
- Go to github.com/settings/applications If you are an organization administrator, use the dropdown menu to ensure you are looking at your personal account. Click the “Authorized OAuth Apps” tab under ‘Applications’.
- Find and click the ‘Skylight’ application in the list.
- You should see a list of permissions and a list of Organizations. If you see ‘Grant’ next to your organization, click it (and skip the rest of these steps!). Otherwise, click ‘Request’ (to ask an administrator to add the app). If this was previously requested and either denied or revoked, proceed to the next step.
- Go back to Github’s settings page and use the dropdown to switch to your organization’s account (or login as your organization’s administrator).
- Click ‘third-party access’. If Skylight is in the list, you can edit approval there. If not, check for pending installation requests under the Github Apps tab.
We sync Github access once per day, so adding all of your approved users may take up to 24 hours after you complete the above steps. Individual users may trigger an immediate sync by clicking “Sync with Github” on the profile page.
Add users by email
The user you invite will receive an invitation via email. If they don’t yet have a Skylight account, that email invite will include a link to sign up. Once they complete the steps, they’ll see the app inside their account.
Renaming an app
Only app owners can rename an app. To do so, visit your app’s settings page, enter the new name into the “App name” field, and click on “Save changes”.
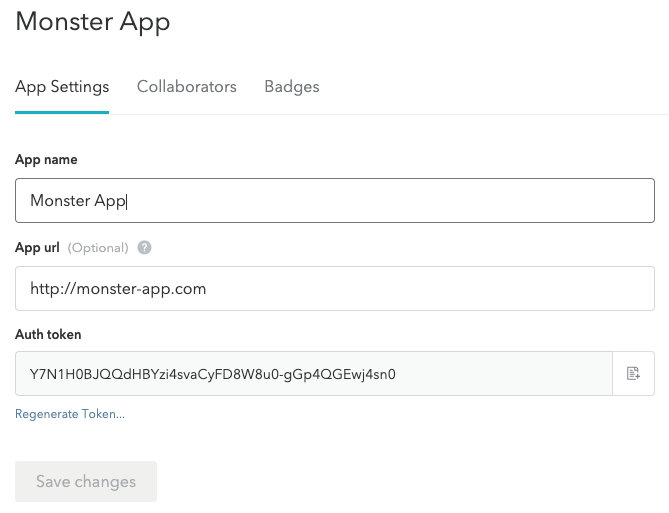
Adding an app URL
Only app owners can add an app URL. To do so, visit your app’s settings page, enter your app’s URL into the “App URL” field, and click on “Save changes”. This will add a direct link to your app from your App Dashboard.
Deleting an app
Only app owners can delete apps. To do so, visit the settings page and find the app you’d like to delete listed in the left sidebar. Click on the app name to visit the settings page for that app. Scroll to the bottom of the page and click the link that says “Delete this application…”
Deletions are permanent, so make absolutely sure you don’t need the app anymore before deleting it!
Removing yourself from a shared app
A shared app is simply an app you have access to but do not own. You can remove yourself from a shared app, if need be. This might be good if you have many shared apps and one of them is no longer relevant to you.
To remove yourself from an app, visit the settings page and find the app listed in the left sidebar. Click on the app name to visit the settings page for that app. Scroll to the bottom of the page and click the link that says “Remove myself from this application…”
Billing
Pricing
Skylight pricing is based on the total number of requests per month across all of the apps that you own. If you are a collaborator on a shared app (and not the owner), you will not be charged for that app’s request usage. A request is considered to be any HTTP request that’s handled by a Rails (or other framework’s) server. Any SQL queries that are initiated as part of a request, for example, are considered to be part of that request and won’t be counted separately.
Skylight is free up to the first 100,000 requests. After that, pricing starts at $20 per million requests handled, and continues according to the schedule on our pricing page. (The max tier is subject to a soft limit on the number of apps. Don’t go too crazy!) As you can also see, the more you need, the lower your cost per million; built-in bulk discounting.
You can use this calculator to determine what your monthly price would be for a given request volume. Need more than 1 billion requests? Contact us for volume pricing.
To be clear: no plans, nothing to choose. Skylight will automatically discount additional requests for you. We’re fond of simplicity.
Annual Pricing
In some situations, you might wish to pay for Skylight on an annual basis. While our pricing is based on your total number of requests per month, we can accommodate requests for annual billing.
Currently, the best option we have for paying for Skylight on an annual basis is by pre-purchasing Skylight credits. We recommend that you pre-pay based on your estimated request usage, using our pricing calculator.
For example, if you estimate that your app(s) will have a monthly request count of 500,000 requests, then you would likely want to purchase a credit of $20 a month, for 12 months, which would amount to a grand total $240 of Skylight credits.
Once you have estimated your request usage and determined how many Skylight credits you’ll likely need to pre-purchase, please contact us via the in-app messenger with the total amoufnt of Skylight credit you’d like to purchase. We will send you a custom invoice for the amount of Skylight credits you’d like to buy. Once we have received a payment from you, we’ll add those credits into our system for the pre-paid amount.
Note:
Pre-purchased Skylight credits are non-refundable and non-transferrable.
Each month, you will receive an invoice on your billing page that will indicate how many requests you used that month, as well as how many credits you have remaining. If you run out of credits, you will be billed monthly based on your usage from the prior month. You’ll need to check these invoices every month to ensure that you have not run out of credits faster than expected, based on your request usage.
Of course, if you realize that you are running low on Skylight credits, then you can always “renew” them by prepaying for them again.
Billing Details
The billing page gives you an overview of your current billing status.
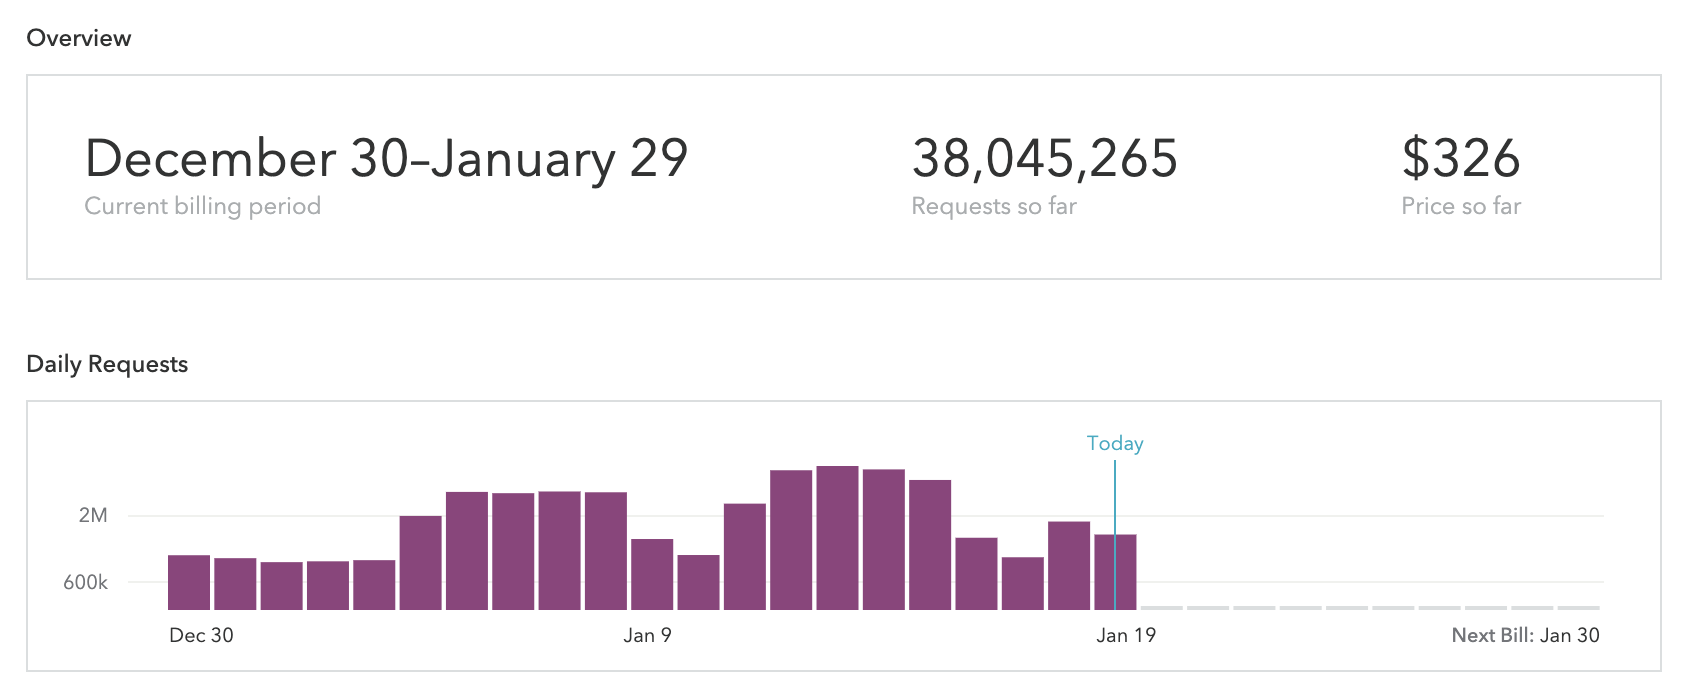
At the top, we present the current billing period, including your total requests and price so far, along with a graph of your daily usage. Hovering over a specific bar in the usage chart will give you the specific number of requests each day.
Below that we show your current billing tier. See the pricing page for more information on tiers.
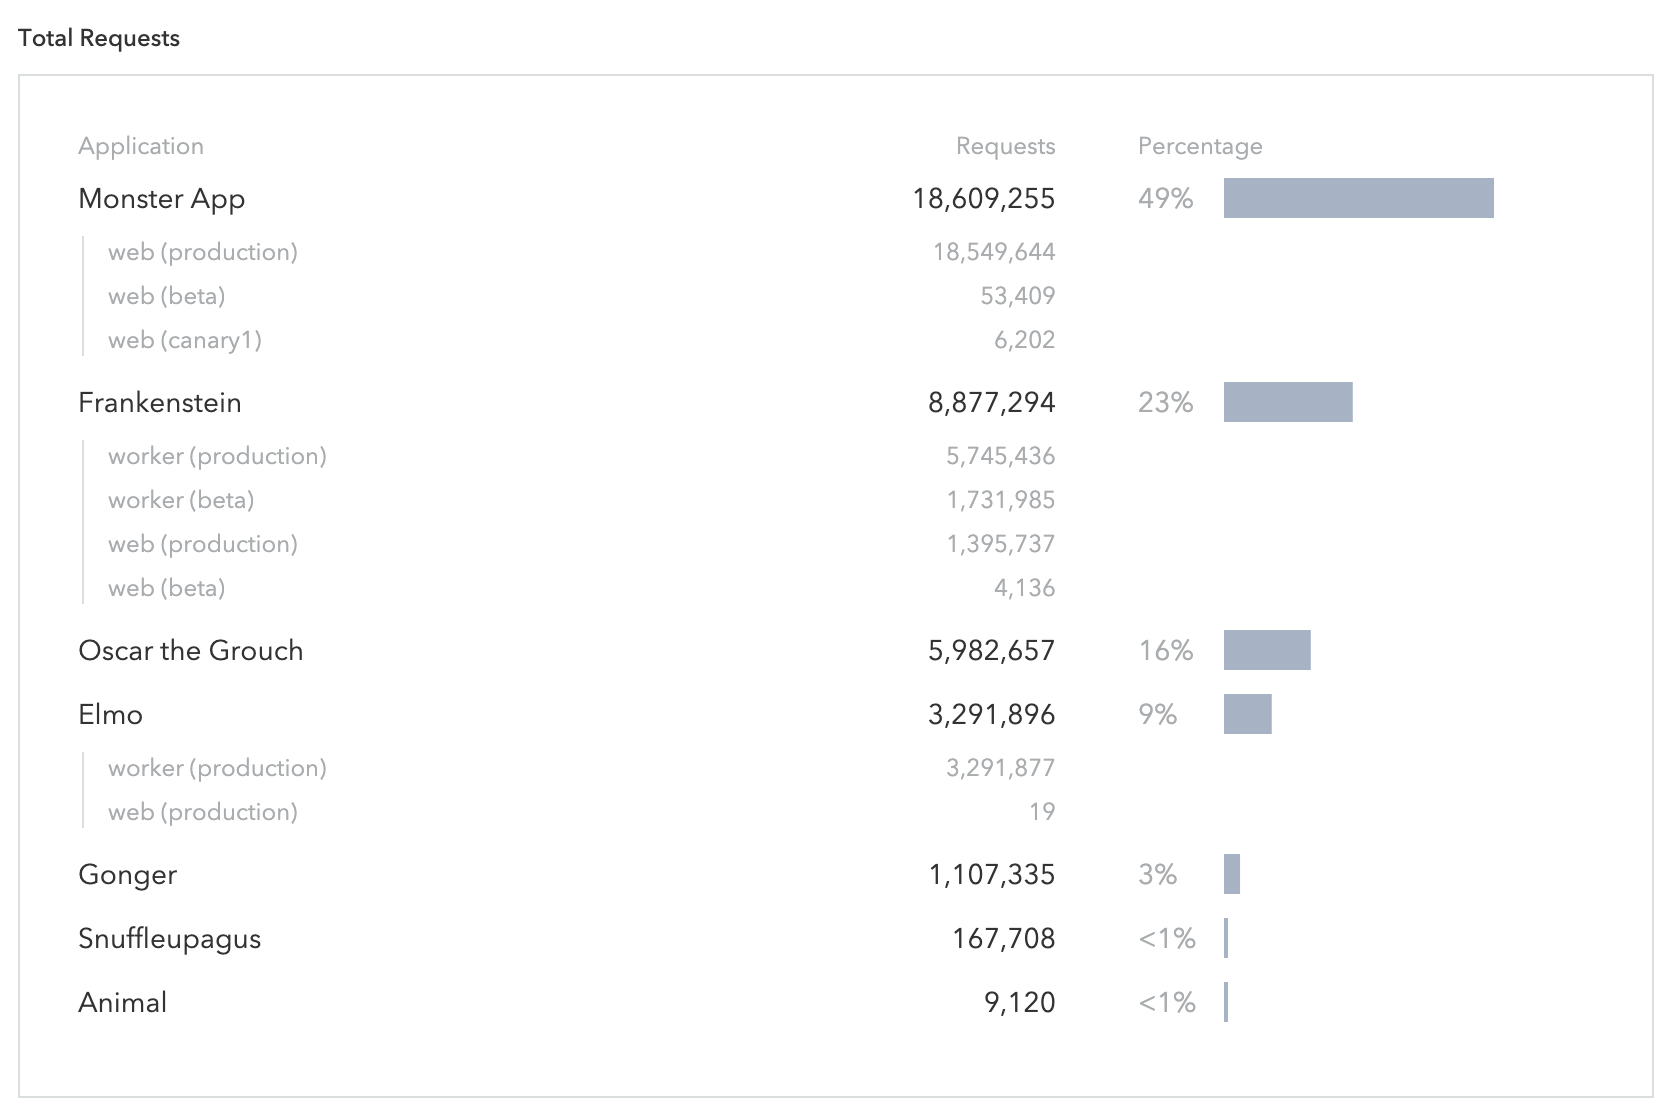
If you have multiple apps, we then show you how your usage breaks down across all of your apps.
The UI does not currently support viewing historical usage. If you need details about past billing cycles, please contact us via the in-app messenger with your request.
Invoice Administration
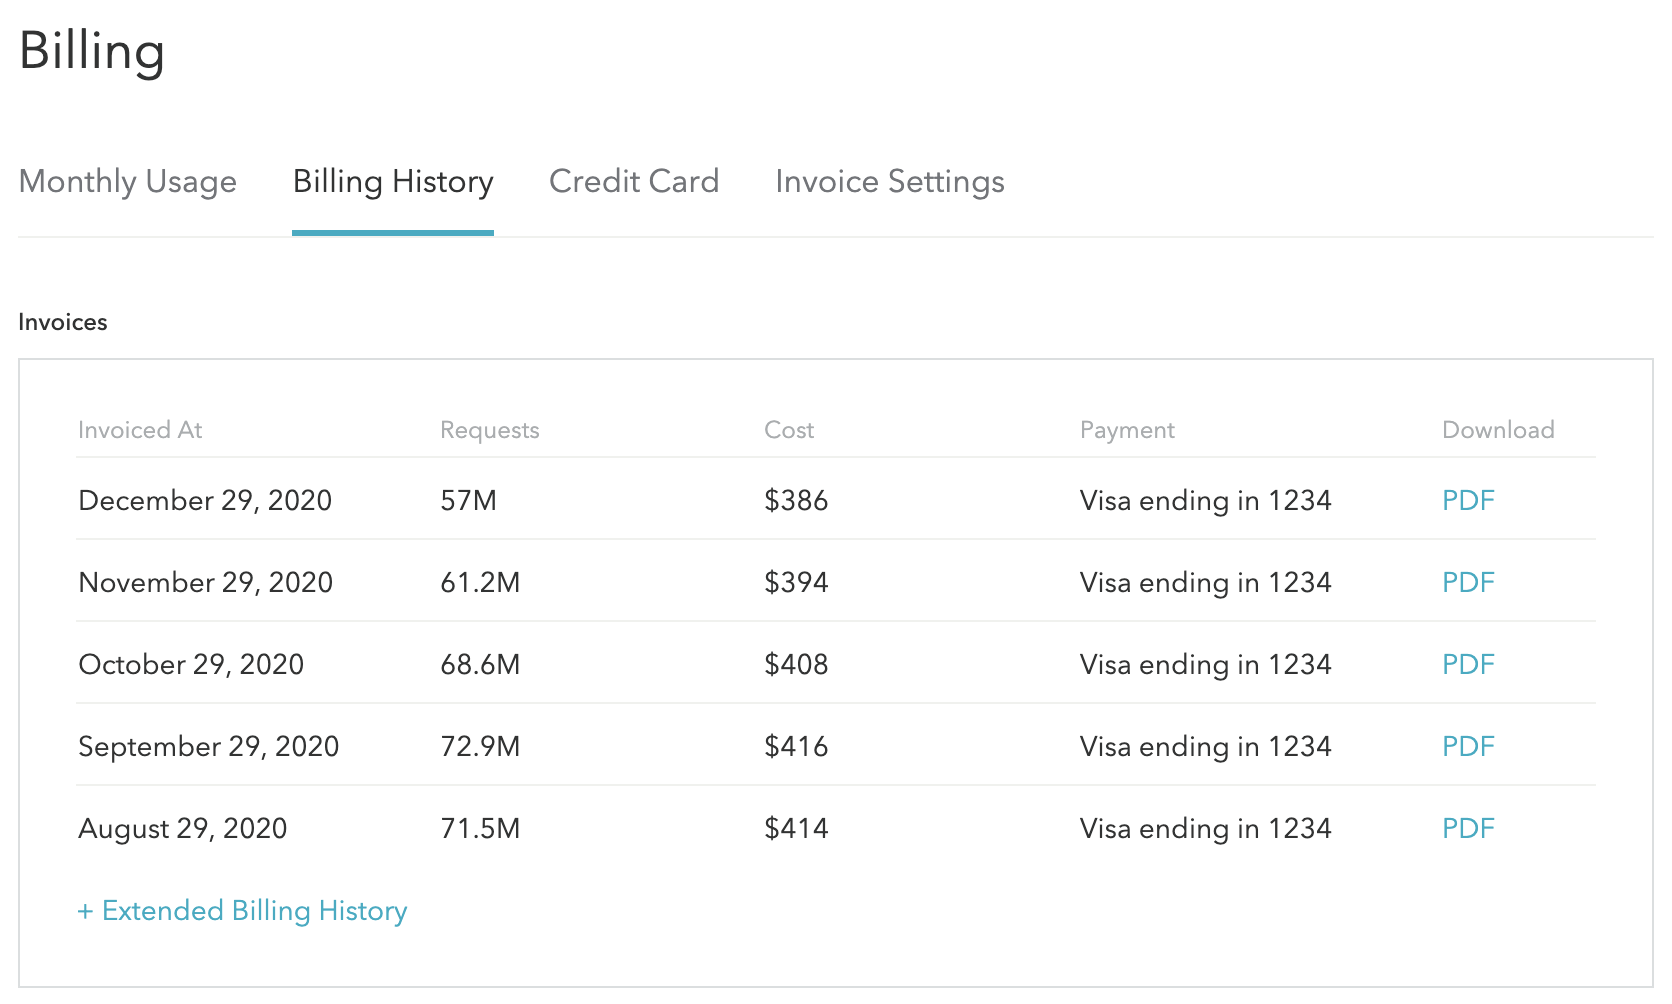
App owners can view and download past invoices by visiting their billing history page.
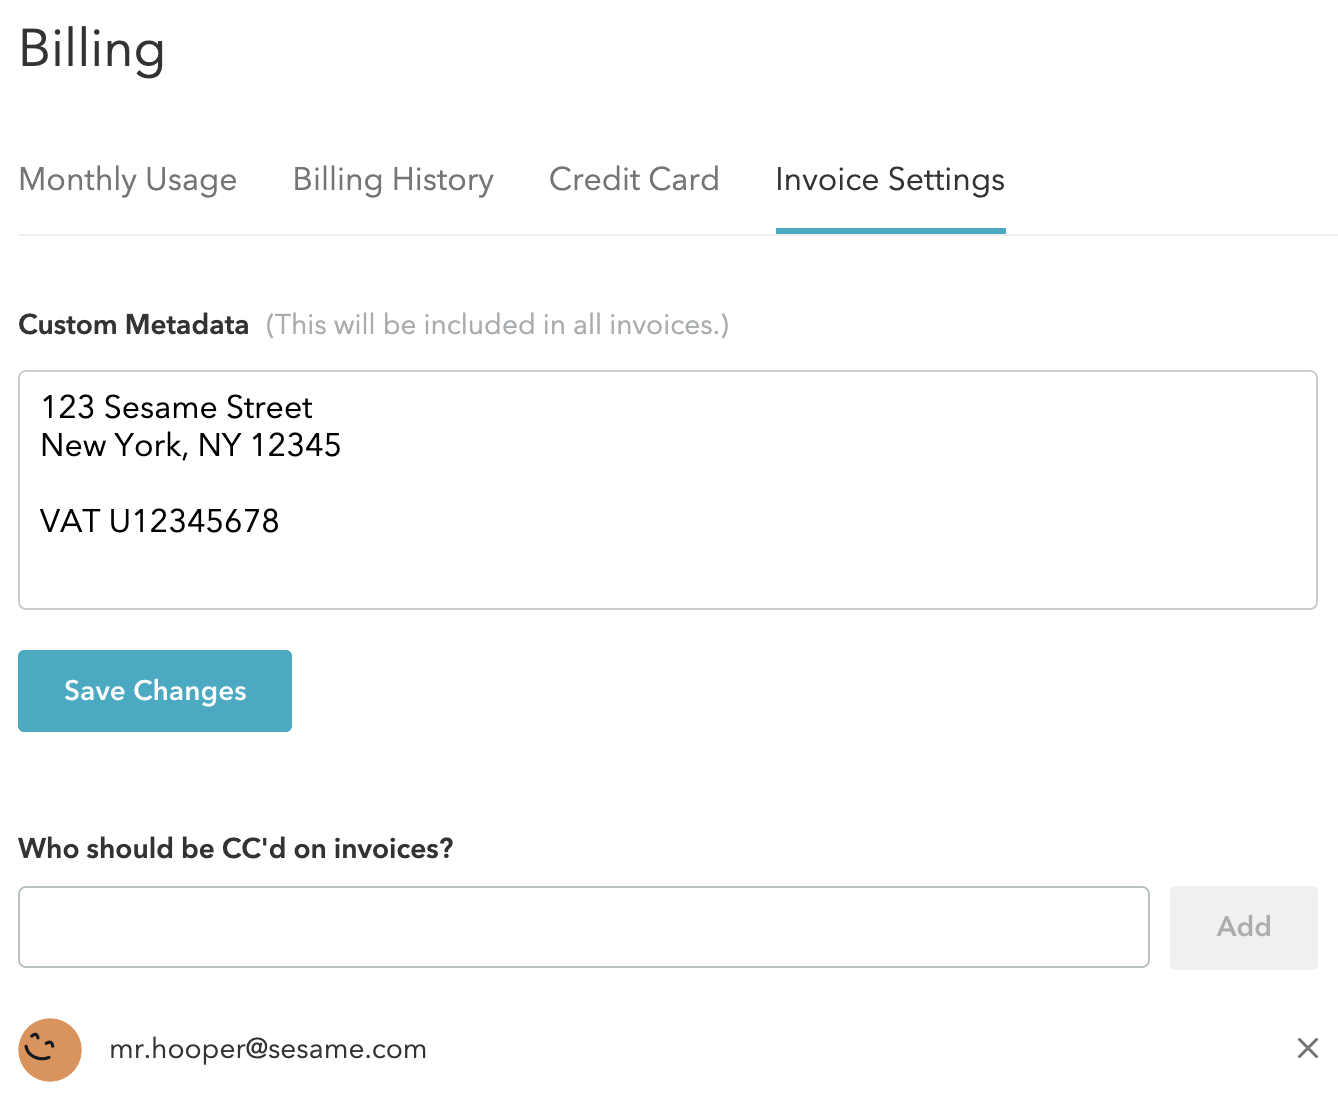
Additionally, app owners can add custom metadata (like addresses and VAT details) and CC additional recipients to invoices (by adding their email addresses) at their billing invoice settings page. Additional recipients do not need Skylight accounts to receive copies of invoices.
Referrals
Skylight users can earn rewards for referring their friends. We’ll give everyone you refer a $50 credit, and you’ll receive a $50 credit as soon as they become a paying customer. And yes, the $50 is in addition to the free 30 day trial they also get. Best of both worlds.
To refer a friend, head over to your referrals page to retrieve your unique referral URL or send email invites directly through Skylight. You can also see a list of the people you’ve invited in the past.